Craving something warm, fluffy, and fresh out of the oven? My Easy Homemade Dinner Rolls are the perfect addition to any meal—whether you’re planning a cozy family dinner, a holiday feast, or simply want something comforting to snack on.

These soft, golden rolls come together with simple pantry ingredients and just a little patience. Trust me—once you try these, you’ll never want store-bought rolls again!
With their pillowy texture and buttery finish, these dinner rolls are a classic comfort food favorite. They’re easy enough for beginners and delicious enough for seasoned bakers to appreciate. So roll up your sleeves, and let’s start baking!
Ingredients List
Dough Ingredients
- 1 (0.25 oz) package active dry yeast
- ¼ cup lukewarm water
- ¾ cup whole milk, scalded (see note below)
- ¼ cup shortening
- ¼ cup sugar
- 1 teaspoon salt
- 1 egg, beaten
- 3 cups all-purpose or bread flour
- 1–2 tablespoons melted butter (for brushing)
Required Kitchen Tools
When making homemade dinner rolls, a few basic kitchen tools will help make the process smoother and more enjoyable:
- Stand Mixer with Dough Hook – Makes kneading easier and more consistent, especially for beginners.
- Mixing Bowls – For activating yeast, combining ingredients, and allowing the dough to rise.
- Measuring Cups & Spoons – Accuracy is key in baking, especially for flour and liquids.
- 9 x 13-inch Baking Dish – Perfect for arranging rolls to rise and bake evenly.
- Plastic Wrap or Clean Kitchen Towel – To cover dough during rising.
- Pastry Brush – Ideal for brushing the rolls with melted butter after baking.

Dough Preparation
Making homemade dinner roll dough is easier than you might think. This simple step-by-step process ensures light, airy rolls every time. Just follow my lead and you’ll have a smooth, elastic dough ready to rise in no time.
Activating the Yeast
In a small bowl, I combine ¼ cup lukewarm water with 1 packet of active dry yeast. I let it sit for 5–10 minutes, until it becomes foamy on top. This step ensures that the yeast is alive and ready to do its magic.
Mixing the Dough
In a large mixing bowl, I pour in the scalded and slightly cooled milk, shortening, sugar, and salt. I stir until everything is well combined and the sugar is mostly dissolved. Once the mixture has cooled to a lukewarm temperature, I add in the activated yeast, beaten egg, and 1 cup of flour.
Using my stand mixer with the paddle or dough hook attachment, I mix on low speed for 30 seconds, scraping the sides as needed. Then, I add the remaining flour and beat on medium speed for about 1–2 minutes, until the dough pulls away from the sides of the bowl and starts to come together.
Kneading and First Rise
Once the dough has formed, I continue kneading it for about 2 more minutes in the mixer (or by hand on a lightly floured surface). The dough should be soft, elastic, and slightly tacky but not sticky.
I lightly oil a clean bowl and place the dough inside, turning it once to coat the surface. Then I cover it tightly with plastic wrap or a clean kitchen towel and let it rise in a warm, draft-free spot for 1 to 2 hours, or until doubled in size.
Shaping and Baking the Rolls
Once your dough has doubled in size and is soft and puffy, it’s time for the fun part—shaping the rolls! This step brings your dinner rolls to life, and it’s simpler than you think.
Punching Down and Dividing
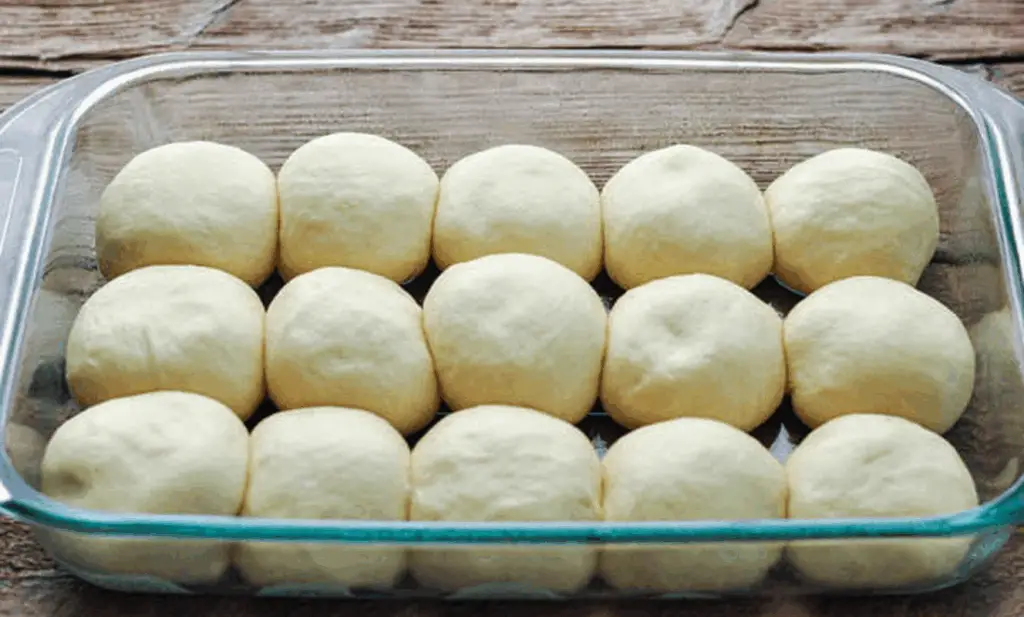
After the first rise, I gently punch down the dough to release the air. Then, I turn it out onto a lightly floured surface and use a sharp knife or bench scraper to divide the dough into 14 to 16 equal portions. If you prefer bigger rolls, divide into 12 pieces instead.
Shaping the Dough Balls
I take each piece and roll it into a smooth ball by tucking the edges underneath and rolling it between my palms. This helps create that soft, rounded shape and ensures even baking.
I then place the dough balls into a greased 9 x 13-inch baking dish, arranging them close enough so they’ll rise into each other slightly as they bake—this gives that classic pull-apart effect.
Second Rise
With the rolls arranged in the pan, I cover them again with a clean towel and let them rise for about 1 hour, or until puffy and almost doubled in size. This second rise is key to getting those airy, tender rolls.
Baking to Perfection
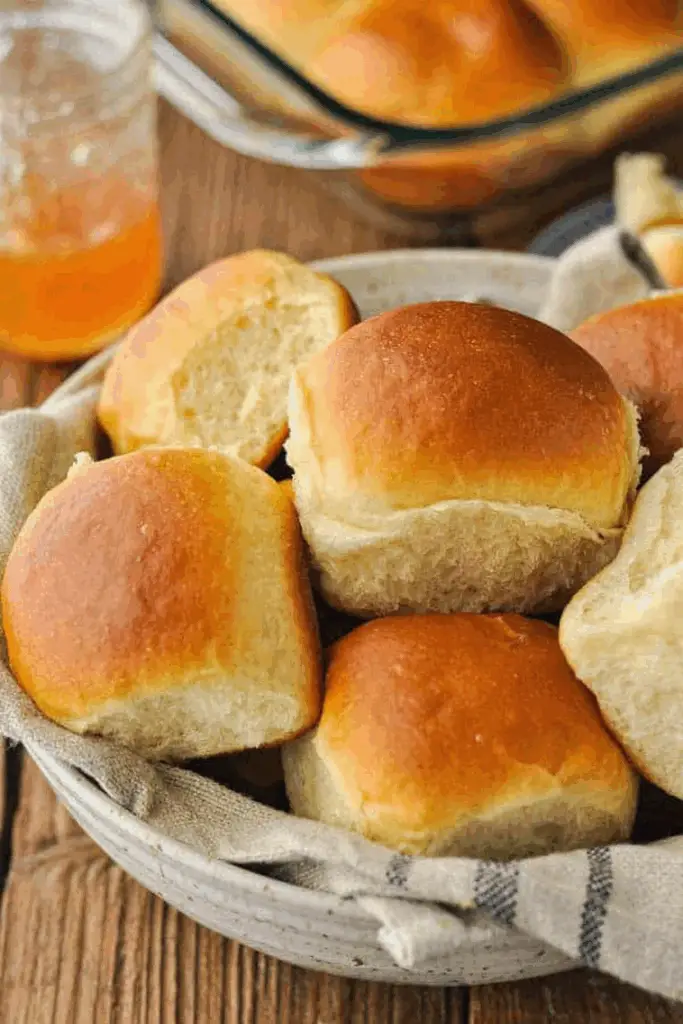
Once the rolls are nice and puffy, I preheat my oven to 350°F (175°C). I bake them on the middle rack for 18–22 minutes, or until the tops are golden brown and the rolls sound hollow when tapped.
As soon as they’re out of the oven, I brush the warm rolls with melted butter for a glossy, flavorful finish. This step adds that irresistible bakery-style touch.
Serving Suggestions & Storage Tips
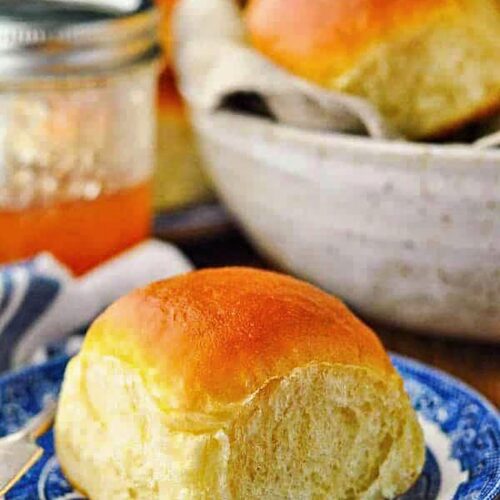
These easy homemade dinner rolls are best enjoyed warm, fresh out of the oven, with that golden buttery top and soft, fluffy center. Whether you’re serving them with roasted chicken, holiday ham, or a bowl of creamy soup, they’re guaranteed to steal the spotlight.
Delicious Ways to Serve Dinner Rolls
- Classic Side Dish: Serve alongside hearty main courses like beef stew, pot roast, or Thanksgiving turkey.
- Mini Sandwiches: Slice them in half and fill with deli meats, pulled pork, or chicken salad for sliders or next-day lunch.
- Breakfast Favorite: Toast leftover rolls with a bit of jam or butter for a simple and satisfying morning treat.
How to Store Dinner Rolls
If you happen to have leftovers (which is rare in my house!), here’s how to keep your dinner rolls fresh and delicious:
At Room Temperature
Place the cooled rolls in an airtight container or zip-top bag. Store them at room temperature for up to 3 days. Reheat briefly in the microwave or oven before serving to bring back that fresh-baked texture.
Freezing Instructions
Want to make a batch ahead of time? These rolls freeze beautifully!
- To freeze unbaked: After shaping, place the dough balls on a tray and freeze until solid. Transfer to a freezer bag and store for up to 1 month. When ready to bake, thaw and let rise before baking as usual.
- To freeze baked rolls: Cool completely, then wrap in foil and place in a freezer bag. To reheat, thaw at room temp and warm in the oven at 300°F for about 10 minutes.
Easy Homemade Dinner Rolls
Equipment
- Stand Mixer with Dough Hook
- Mixing Bowls
- Measuring Cups & Spoons
- 9 x 13-inch Baking Dish
- Plastic Wrap or Clean Kitchen Towel
- Pastry Brush
Ingredients
Dough Ingredients
- 1 (0.25 oz) package active dry yeast
- ¼ cup lukewarm water
- ¾ cup whole milk, scalded (see note below)
- ¼ cup shortening
- ¼ cup sugar
- 1 teaspoon salt
- 1 egg, beaten
- 3 cups all-purpose or bread flour
- 1–2 tablespoons melted butter (for brushing)
Instructions
Dough Preparation
- In a small bowl, I combine ¼ cup lukewarm water with 1 packet of active dry yeast. I let it sit for 5–10 minutes, until it becomes foamy on top. This step ensures that the yeast is alive and ready to do its magic.
- In a large mixing bowl, I pour in the scalded and slightly cooled milk, shortening, sugar, and salt. I stir until everything is well combined and the sugar is mostly dissolved. Once the mixture has cooled to a lukewarm temperature, I add in the activated yeast, beaten egg, and 1 cup of flour.Using my stand mixer with the paddle or dough hook attachment, I mix on low speed for 30 seconds, scraping the sides as needed. Then, I add the remaining flour and beat on medium speed for about 1–2 minutes, until the dough pulls away from the sides of the bowl and starts to come together.
- Once the dough has formed, I continue kneading it for about 2 more minutes in the mixer (or by hand on a lightly floured surface). The dough should be soft, elastic, and slightly tacky but not sticky.I lightly oil a clean bowl and place the dough inside, turning it once to coat the surface. Then I cover it tightly with plastic wrap or a clean kitchen towel and let it rise in a warm, draft-free spot for 1 to 2 hours, or until doubled in size.
Shaping and Baking the Rolls
- After the first rise, I gently punch down the dough to release the air. Then, I turn it out onto a lightly floured surface and use a sharp knife or bench scraper to divide the dough into 14 to 16 equal portions. If you prefer bigger rolls, divide into 12 pieces instead.
- I then place the dough balls into a greased 9 x 13-inch baking dish, arranging them close enough so they’ll rise into each other slightly as they bake—this gives that classic pull-apart effect.
- With the rolls arranged in the pan, I cover them again with a clean towel and let them rise for about 1 hour, or until puffy and almost doubled in size. This second rise is key to getting those airy, tender rolls.
- Once the rolls are nice and puffy, I preheat my oven to 350°F (175°C). I bake them on the middle rack for 18–22 minutes, or until the tops are golden brown and the rolls sound hollow when tapped.
Conclusion
Baking these easy homemade dinner rolls from scratch isn’t just about making a side dish—it’s about creating warm, memorable moments around the table. With simple ingredients, a little patience, and the step-by-step process we walked through together, you’ll have a tray of soft, golden, bakery-style rolls to be proud of.
Whether you’re preparing a holiday spread or a cozy weeknight dinner, these rolls are a timeless classic that never disappoints. Now that you’ve mastered them, go ahead and make them a regular part of your baking rotation—you won’t regret it!