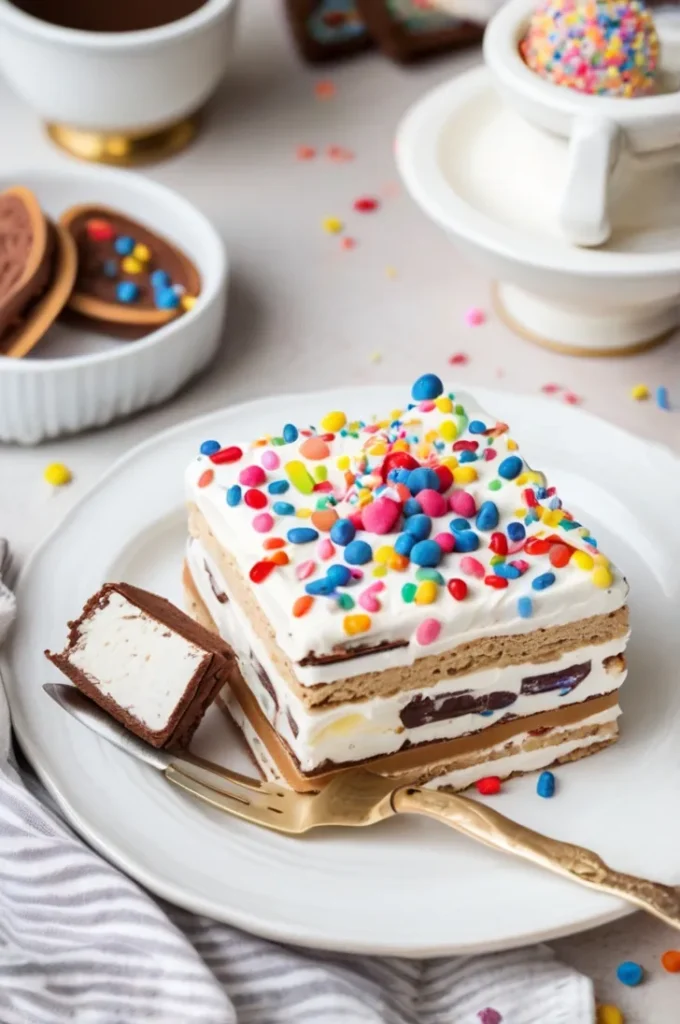
Craving something indulgent and easy to make? Look no further than this Ice Cream Sandwich Cake! This fun, no-bake dessert is the ultimate treat for hot days or any time you want a sweet, frozen delight.

Layers of ice cream sandwiches, whipped topping, and a variety of sweet toppings create a mouthwatering combination that will have everyone asking for seconds. Plus, it’s super simple to prepare, making it perfect for any occasion!
Whether you’re serving this cake at a family gathering, a birthday party, or just for a weekend treat, it’s sure to impress with its rich flavor and satisfying texture. Let’s dive into how you can make this irresistible dessert!
Ingredients List
Main Ingredients
- 24 ice cream sandwiches (your favorite flavor or even a mix of flavors!)
- 16 ounces frozen whipped topping (like Cool Whip), thawed in the refrigerator
- Chocolate syrup (for drizzling)
- Caramel syrup (for drizzling)
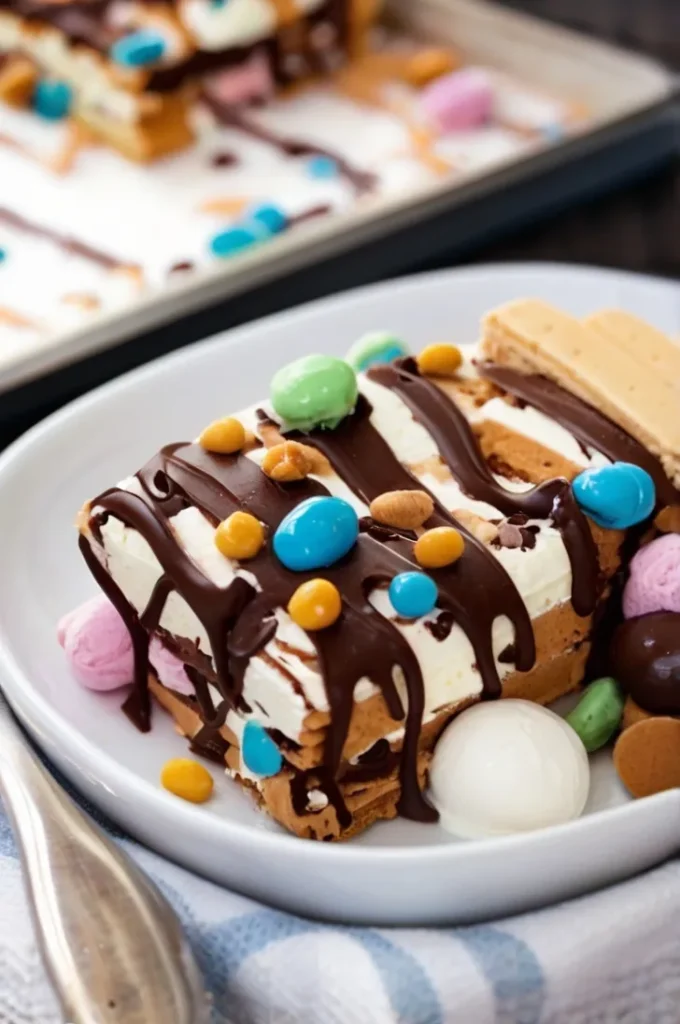
- Topping of your choice: You can get creative with mini M&M’s, sprinkles, crushed Oreo cookies, toffee bits, chopped nuts, chopped candy bars, chocolate chips, or anything else you love!
Required Kitchen Tools
Before you start assembling this delicious Ice Cream Sandwich Cake, make sure you have the right tools in your kitchen. These tools will help you create a beautiful, perfectly layered cake with ease:
- 9 x 13-inch Baking Dish: This is the perfect size to layer the ice cream sandwiches and whipped topping. It’s also deep enough to give the cake structure and hold everything together as it freezes.
- Spatula: A spatula will help you smoothly spread the whipped topping over the layers of ice cream sandwiches, ensuring each layer is evenly coated.
- Spoons or Small Knife: Use these to gently press the ice cream sandwiches down after softening them, ensuring that they fit perfectly in the dish. You’ll also need them to drizzle the syrups in beautiful swirls!
- Measuring Spoons: For precision when adding syrups and toppings. While this recipe is forgiving, accurate measurements will help ensure the perfect balance of flavors.
- Freezer Space: You’ll need a little bit of space in your freezer to chill and firm up the cake before serving, so make sure you have room!
With these tools in hand, you’re ready to make your dessert even more effortless and enjoyable to assemble!
Assembling the Cake
Now comes the fun part—assembling your Ice Cream Sandwich Cake! This is where you can get creative with your toppings and syrups, making each layer look and taste amazing.
Step-by-Step Assembly
- First Layer of Ice Cream Sandwiches:
Start by laying down 12 ice cream sandwiches in the bottom of your 9 x 13-inch dish. If your dish is a little smaller, you can gently cut the last ice cream sandwich in half to make it fit perfectly. Let the sandwiches soften for a few minutes to make them easier to work with. Once softened, use a spoon to gently press the ice cream sandwiches down slightly, which helps them fit more snugly together. If your pan is deep enough, you can skip this step. - Spread the Whipped Topping:
After the first layer of ice cream sandwiches is in place, spread half of the thawed whipped topping over the ice cream sandwiches, using your spatula to smooth it out evenly. This layer of whipped topping creates a fluffy, creamy contrast to the frozen ice cream sandwiches. - Add the Drizzles and Toppings:
Drizzle a generous amount of chocolate syrup and caramel syrup over the whipped topping layer. Let the syrups swirl naturally for a beautiful, marbled effect. Then, sprinkle your choice of toppings. I love to use mini M&M’s, crushed Oreo cookies, or toffee bits for some extra crunch and color, but feel free to get creative with your favorite mix-ins! - Top with Another Layer of Ice Cream Sandwiches:
Place another layer of 12 ice cream sandwiches on top of the whipped topping layer. Press them down gently as before, ensuring the ice cream sandwiches fit neatly in place. - Finish with Whipped Topping, Syrups, and Toppings:
Spread the remaining whipped topping over this second layer of ice cream sandwiches. Drizzle more chocolate and caramel syrups for an extra touch of sweetness. Sprinkle additional toppings as desired, making sure every inch is covered with something yummy!

Freezing and Serving
Once your Ice Cream Sandwich Cake is fully assembled, it’s time to let it set in the freezer, so all those layers come together perfectly. Here’s how to finish it up:
Freezing for Firmness
Place your dish in the freezer and let it chill for at least 1-2 hours, or ideally overnight. This gives the cake enough time to firm up, making it easier to slice and serve. The freezing process also helps the layers meld together, so you get that perfect texture when you take a bite.
Serving the Cake
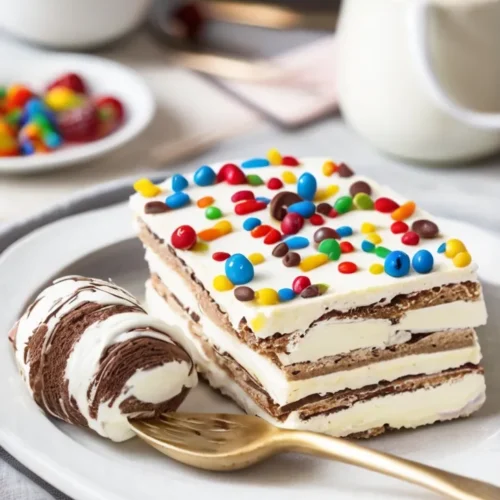
Once the cake has firmed up, it’s time to slice and serve! The frozen ice cream sandwiches, combined with the whipped topping and drizzled syrups, create a decadent, creamy dessert that’s perfect for a hot day. You can garnish the cake with a bit more sprinkles or syrup before serving for an extra touch of flair!
Storage Instructions
How to Keep Ice Cream Sandwich Cake Fresh
If you have leftovers (which is unlikely, but just in case!), you can store your Ice Cream Sandwich Cake in the freezer for up to 1-2 weeks. Simply cover it tightly with plastic wrap or foil to prevent freezer burn and maintain its freshness.
Freezing Leftovers
If you want to store individual servings, you can slice the cake and wrap each piece in plastic wrap before freezing. This makes for a quick, easy treat when the craving strikes!
Ice Cream Sandwich Cake Recipe
Equipment
- 9 x 13-inch Baking Dish
- Spatula
- Spoons or Small Knife
- Measuring Spoons
- Freezer Space
Ingredients
- 24 ice cream sandwiches (your favorite flavor or even a mix of flavors!)
- 16 ounces frozen whipped topping (like Cool Whip), thawed in the refrigerator
- Chocolate syrup (for drizzling)
- Caramel syrup (for drizzling)
- Topping of your choice: You can get creative with mini M&M’s, sprinkles, crushed Oreo cookies, toffee bits, chopped nuts, chopped candy bars, chocolate chips, or anything else you love!
Instructions
- Start by laying down 12 ice cream sandwiches in the bottom of your 9 x 13-inch dish. If your dish is a little smaller, you can gently cut the last ice cream sandwich in half to make it fit perfectly. Let the sandwiches soften for a few minutes to make them easier to work with. Once softened, use a spoon to gently press the ice cream sandwiches down slightly, which helps them fit more snugly together. If your pan is deep enough, you can skip this step.
- After the first layer of ice cream sandwiches is in place, spread half of the thawed whipped topping over the ice cream sandwiches, using your spatula to smooth it out evenly. This layer of whipped topping creates a fluffy, creamy contrast to the frozen ice cream sandwiches.
- Drizzle a generous amount of chocolate syrup and caramel syrup over the whipped topping layer. Let the syrups swirl naturally for a beautiful, marbled effect. Then, sprinkle your choice of toppings. I love to use mini M&M’s, crushed Oreo cookies, or toffee bits for some extra crunch and color, but feel free to get creative with your favorite mix-ins!
- Place another layer of 12 ice cream sandwiches on top of the whipped topping layer. Press them down gently as before, ensuring the ice cream sandwiches fit neatly in place.
- Spread the remaining whipped topping over this second layer of ice cream sandwiches. Drizzle more chocolate and caramel syrups for an extra touch of sweetness. Sprinkle additional toppings as desired, making sure every inch is covered with something yummy!
Conclusion
This Ice Cream Sandwich Cake is an irresistible treat that combines convenience with indulgence. The best part is that you can customize it to your tastes with different toppings and syrups. Whether you’re serving it for a special occasion or just as a fun dessert for the family, it’s guaranteed to be a hit. With simple ingredients and easy steps, you’ll be enjoying a sweet, frozen delight in no time!
So, gather your ingredients, get your freezer ready, and enjoy this refreshing and delicious Ice Cream Sandwich Cake!