Craving something sweet, tangy, and refreshingly cool? This Key Lime Icebox Cake is hands down one of my favorite no-bake summer desserts! With layers of graham crackers,
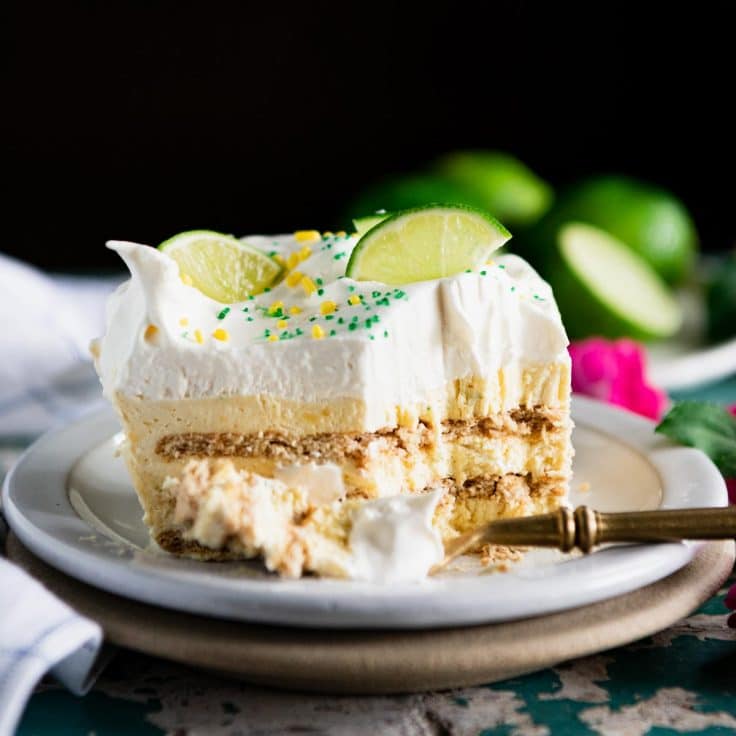
a creamy lime-infused pudding filling, and a cloud of whipped topping, it’s the kind of treat that hits the spot on hot days — or any day, really.
What I love most? It’s crazy easy to make. You don’t need to turn on the oven, and there’s no complicated prep. If you’re a fan of key lime pie, you’ll go wild for this cake.
It’s got the same punchy lime flavor, but with the cozy, nostalgic feel of an old-school icebox cake. Whether you’re hosting a BBQ, planning a picnic, or just treating yourself, this easy lime dessert is a guaranteed crowd-pleaser.
Let’s jump into the ingredients and tools you’ll need to whip up this cool and creamy dessert.
Ingredients List
Here’s what you’ll need to make your own delicious Key Lime Icebox Cake:
- 4 ounces (half a block) cream cheese, softened at room temperature
- 1 (3.4 ounce) box instant French vanilla pudding mix (just the dry mix — do not prepare it)
- ¼ cup key lime juice (or sub with fresh regular lime juice)
- 1 ¼ cups milk
- Zest from 2 small limes (about 1 tablespoon)
- 1 (8 ounce) container Cool Whip, thawed and divided
- 12 graham crackers (or more, depending on your dish size)
- Optional garnish: green sprinkles, lime zest, lime wedges, or fresh berries
Pro Tip: Use freshly squeezed lime juice and real lime zest for that bright, citrusy punch that makes this cake irresistible.
Required Kitchen Tools
Before you get started, here are the basic kitchen tools that make this no-bake cake a breeze to put together:

- Electric Hand Mixer or Stand Mixer
To beat the cream cheese and blend the pudding mixture until smooth and fluffy. - Mixing Bowls
One large mixing bowl for your filling and a smaller one for garnishes or zest. - Zester or Microplane
Essential for getting that fresh lime zest without the bitter pith. - Rubber Spatula
Perfect for folding in the Cool Whip without deflating it. - Deep 8-inch Square Dish
Make sure it’s deep (at least 2.5 to 3 inches high) to fit all the delicious layers. - Measuring Cups and Spoons
For accuracy — and consistent results every time.
Step-by-Step Instructions

This easy no-bake lime dessert comes together in just a few simple steps. The hardest part? Waiting for it to chill. Here’s exactly how I make this Key Lime Icebox Cake every single time.
1. Whip the Cream Cheese
I start by placing the softened cream cheese in a large mixing bowl. Using an electric hand mixer, I beat it on medium speed for about 1½ to 2 minutes until it’s light, smooth, and fluffy. This step is important — no one wants lumps in their pudding!
2. Add Pudding Mix and Lime Juice
Next, I add the dry instant French vanilla pudding mix and the key lime juice straight into the cream cheese. No need to prepare the pudding beforehand — just add the dry powder. I mix until everything is well combined. The mixture will be very thick at this point, but that’s totally normal.
3. Pour in the Milk Slowly
Now I gradually pour in the milk, mixing constantly to avoid any clumps. After a few minutes, it transforms into a thick, creamy pudding. I don’t worry about a few little lumps — they won’t be noticeable in the final cake.
4. Fold in Lime Zest and Cool Whip
Once the pudding base is ready, I gently stir in the lime zest. Then, using a spatula, I carefully fold in half of the Cool Whip. This step is all about patience — I fold slowly so I don’t deflate that airy, whipped texture. It gives the cake that dreamy, mousse-like consistency.
5. Build the Layers
Now comes the fun part: layering! I spread about ¼ cup of the pudding mixture in a very thin layer across the bottom of a deep 8-inch square dish. This helps keep the graham crackers in place.
Then I add a layer of graham crackers, breaking them as needed to fully cover the base. On top of that, I spread about ⅓ of the remaining pudding mixture. I repeat the layers: graham crackers, pudding, graham crackers, and pudding again — ending with a thick layer of pudding on top.
6. Top with Cool Whip
To finish it off, I spread the remaining half of the Cool Whip over the top layer of pudding. It creates a smooth, fluffy finish that’s perfect for decorating later.
Chilling and Serving Tips

One of the best things about this no-bake key lime dessert is how well it sets up in the fridge or freezer. But trust me — giving it enough time to chill is absolutely essential for those clean, beautiful layers.
Chill or Freeze: You Decide
Once my cake is fully assembled, I cover it tightly with plastic wrap. From there, I have two great options:
- Refrigerate it overnight if I plan to serve it the next day. This allows the graham crackers to soften into cake-like layers while the filling firms up.
- Freeze it for at least 4 hours for a firmer, sliceable treat — more like a frozen key lime pie. Perfect for hot summer days!
Quick Tip: If frozen, I always let it sit out at room temperature for 15–20 minutes before slicing. This softens it just enough so it’s easy to cut but still holds its shape.
Topping Ideas for a Gorgeous Finish
Here’s where you can have fun and make your Key Lime Icebox Cake shine! These topping ideas add color, texture, and a bit of flair.
- Extra lime zest — Brightens the look and flavor.
- Lime wedges or twists — Adds a tropical touch on top.
- Green sprinkles — For a playful pop of color.
- Fresh berries — Strawberries, raspberries, or blueberries are a perfect fruity contrast.
- Crushed graham cracker crumbs — Sprinkled on top for crunch and a pretty, rustic finish.
I like to garnish just before serving so everything stays fresh and vibrant.

Storage Instructions
Keeping Your Icebox Cake Fresh
If you have leftovers (which is rare in my house!), this make-ahead summer dessert stores beautifully:
- Refrigerator: Cover the dish tightly and store in the fridge for up to 3 days. The graham crackers may soften more over time, but the flavor only gets better.
- Freezer: Want to enjoy a slice later? Freeze the cake in an airtight container or wrap the dish tightly in plastic wrap and foil. It’ll keep well in the freezer for up to 1 month. Just thaw in the fridge overnight or let it sit on the counter for about 15–20 minutes before serving.
Extra Tips for the Perfect Key Lime Icebox Cake
- Thaw the Cool Whip in the fridge — not on the counter. It keeps the texture light and fluffy.
- Use the right pudding mix — You want the instant kind, not cook-and-serve. Otherwise, your filling won’t set.
- Watch the lime zest — Only zest the bright green outer layer. Avoid the bitter white pith underneath.
- Use a deep 8-inch dish — A dish with at least 2½–3 inch sides gives your cake plenty of room to build those dreamy layers.

Key Lime Icebox Cake
Equipment
- Electric hand mixer or stand mixer
- Mixing Bowls
- Zester or Microplane
- Rubber Spatula
- Deep 8-inch Square Dish
- Measuring Cups and Spoons
Ingredients
- 4 ounces (half a block) cream cheese, softened at room temperature
- 1 (3.4 ounce) box instant French vanilla pudding mix (just the dry mix — do not prepare it)
- ¼ cup key lime juice (or sub with fresh regular lime juice)
- 1 ¼ cups milk
- Zest from 2 small limes (about 1 tablespoon)
- 1 (8 ounce) container Cool Whip, thawed and divided
- 12 graham crackers (or more, depending on your dish size)
- Optional garnish: green sprinkles, lime zest, lime wedges, or fresh berries
Instructions
- I start by placing the softened cream cheese in a large mixing bowl. Using an electric hand mixer, I beat it on medium speed for about 1½ to 2 minutes until it’s light, smooth, and fluffy. This step is important — no one wants lumps in their pudding!
- Next, I add the dry instant French vanilla pudding mix and the key lime juice straight into the cream cheese. No need to prepare the pudding beforehand — just add the dry powder. I mix until everything is well combined. The mixture will be very thick at this point, but that’s totally normal.
- Now I gradually pour in the milk, mixing constantly to avoid any clumps. After a few minutes, it transforms into a thick, creamy pudding. I don’t worry about a few little lumps — they won’t be noticeable in the final cake.
- Once the pudding base is ready, I gently stir in the lime zest. Then, using a spatula, I carefully fold in half of the Cool Whip. This step is all about patience — I fold slowly so I don’t deflate that airy, whipped texture. It gives the cake that dreamy, mousse-like consistency.
- Now comes the fun part: layering! I spread about ¼ cup of the pudding mixture in a very thin layer across the bottom of a deep 8-inch square dish. This helps keep the graham crackers in place.
- Then I add a layer of graham crackers, breaking them as needed to fully cover the base. On top of that, I spread about ⅓ of the remaining pudding mixture. I repeat the layers: graham crackers, pudding, graham crackers, and pudding again — ending with a thick layer of pudding on top.
Conclusion
Whether you’re cooling off on a hot day or just need a no-fuss dessert that looks impressive and tastes even better, this Key Lime Icebox Cake is the answer. It’s sweet, tangy, creamy, and downright irresistible — and the fact that it’s a no-bake recipe makes it even more lovable.