Craving bold, crispy, and flavor-packed chicken? Let me introduce you to one of Korea’s most beloved dishes: Korean Fried Chicken (Yangnyeom Chicken).

This isn’t your average fried chicken — it’s double-fried to crunchy perfection and coated in a sticky, spicy, and slightly sweet glaze that clings to every bite.
Whether you’re preparing it for a weekend treat, game day, or just because you need some serious comfort food, this recipe is going to hit all the right notes.
Ingredients List
Chicken and Batter Ingredients
- 2 lbs chicken wings and drumettes
- ½ cup potato starch
- ¼ cup all-purpose flour
- 1 tsp garlic powder
- ½ tsp black pepper
- ½ tsp salt
- ¼ tsp cayenne pepper (optional, for extra heat)
- 1 egg
- ½ tsp baking powder
- ⅓ cup ice-cold club soda
- Peanut oil (for deep frying)
Yangnyeom Sauce Ingredients (Korean Spicy Glaze)
- ¼ cup extra spicy gochujang (Korean chili paste)
- ¼ cup rice syrup (or honey)
- 3 garlic cloves, minced
- 1 tbsp soy sauce
- 1 tbsp brown sugar
- 1 tsp sesame oil
- 1 tsp rice vinegar
- 1 tbsp water (optional, to thin the sauce)
Required Kitchen Tools
Having the right tools will set you up for success when making Korean Fried Chicken at home. Here’s what I recommend:
- Deep Frying Pot or Dutch Oven – For even and safe deep frying.
- Kitchen Thermometer – Critical for maintaining the correct oil temperature during both fry stages.
- Mixing Bowls – For seasoning, battering, and sauce preparation.
- Wire Cooling Rack – To drain and keep chicken crispy after frying.
- Tongs or Chopsticks – For flipping and removing chicken without damaging the coating.
- Whisk – Useful for blending your wet batter and sauce smoothly.
- Basting Brush or Large Bowl – For coating the chicken in the spicy Yangnyeom sauce.
With all your ingredients and tools ready, you’re just a few steps away from creating irresistibly crunchy and saucy Korean fried chicken.
Chicken Preparation
Step 1: Seasoning the Chicken
Start by patting the chicken wings and drumettes dry with paper towels. This helps the batter stick better and ensures a crispy texture after frying. In a large bowl, season the chicken with:
- Salt
- Garlic powder
- Black pepper
- Optional cayenne pepper (if you like extra heat)
Mix well to coat all the pieces evenly. Cover the bowl and refrigerate for at least 1 hour. This step enhances flavor and helps the seasoning absorb into the meat.
Batter Preparation
Step 2: Creating the Wet and Dry Batters
For the ultra-crispy exterior that Korean fried chicken is famous for, we’ll be using a dual-batter system: one wet and one dry.
Wet Batter
In a mixing bowl, whisk together:
- ¼ cup all-purpose flour
- 1 egg
- ½ tsp baking powder
- ⅓ cup ice-cold club soda
The batter should be light and slightly runny. The cold soda creates bubbles, leading to a crispier finish.
Dry Coating
In a separate bowl, combine:
- ½ cup potato starch
- A small pinch of salt (optional, for flavor layering)
This dry coat is the secret to that signature crunch.
First Fry
Step 3: Heating the Oil
Pour peanut oil into a deep pot or Dutch oven until it’s at least 2 inches deep. Heat the oil to 350°F (175°C). Use a kitchen thermometer to monitor the temperature accurately.
Step 4: Coating the Chicken
Take each piece of seasoned chicken and:
- Dip it into the wet batter.
- Let any excess drip off.
- Coat it generously in the dry potato starch mixture.
- Shake off any excess and set aside on a tray.
Step 5: First Fry
Carefully place 4–5 pieces of chicken into the hot oil. Don’t overcrowd the pan — it will drop the temperature and result in soggy chicken.
- Fry for about 7 minutes, until lightly golden and partially cooked.
- Remove with tongs or a slotted spoon and place on a wire rack to drain.
Repeat with the remaining pieces.
Second Fry
Step 6: The Secret to Crunch
Once all the chicken pieces have gone through the first fry, raise the oil temperature to 370°F (188°C).
Fry the chicken again in small batches for 1–2 minutes, or until they turn a deep golden brown and sound crisp when tapped.
Double-frying is the key to ultra-crunchy Korean fried chicken that stays crispy even after adding sauce.
Making the Yangnyeom Sauce
The star of Korean Fried Chicken is its signature Yangnyeom sauce — a fiery, sweet, and umami-packed glaze that clings to every crispy bite. It’s bold, addictive, and incredibly easy to make.
Step 1: Sauté the Garlic
In a small saucepan over medium heat, add a dash of neutral oil (you can use a bit of the frying oil or sesame oil for extra flavor). Add the minced garlic and sauté for about 30 seconds until fragrant. Be careful not to burn it — you want it golden, not brown.
Step 2: Add Remaining Sauce Ingredients
Lower the heat slightly, then add the rest of the sauce ingredients:
- ¼ cup gochujang (extra spicy, if you like it hot)
- ¼ cup rice syrup (or honey, for that signature sticky sweetness)
- 1 tbsp soy sauce
- 1 tbsp brown sugar
- 1 tsp sesame oil
- 1 tsp rice vinegar
- Optional: 1 tbsp water to thin the sauce slightly if it’s too thick
Whisk everything together and let the sauce simmer gently for 2–3 minutes, just until it thickens slightly and becomes glossy. Once done, remove it from the heat and set it aside.
Tip: You can adjust the heat level by adding more or less gochujang or balancing it with extra syrup or sugar.
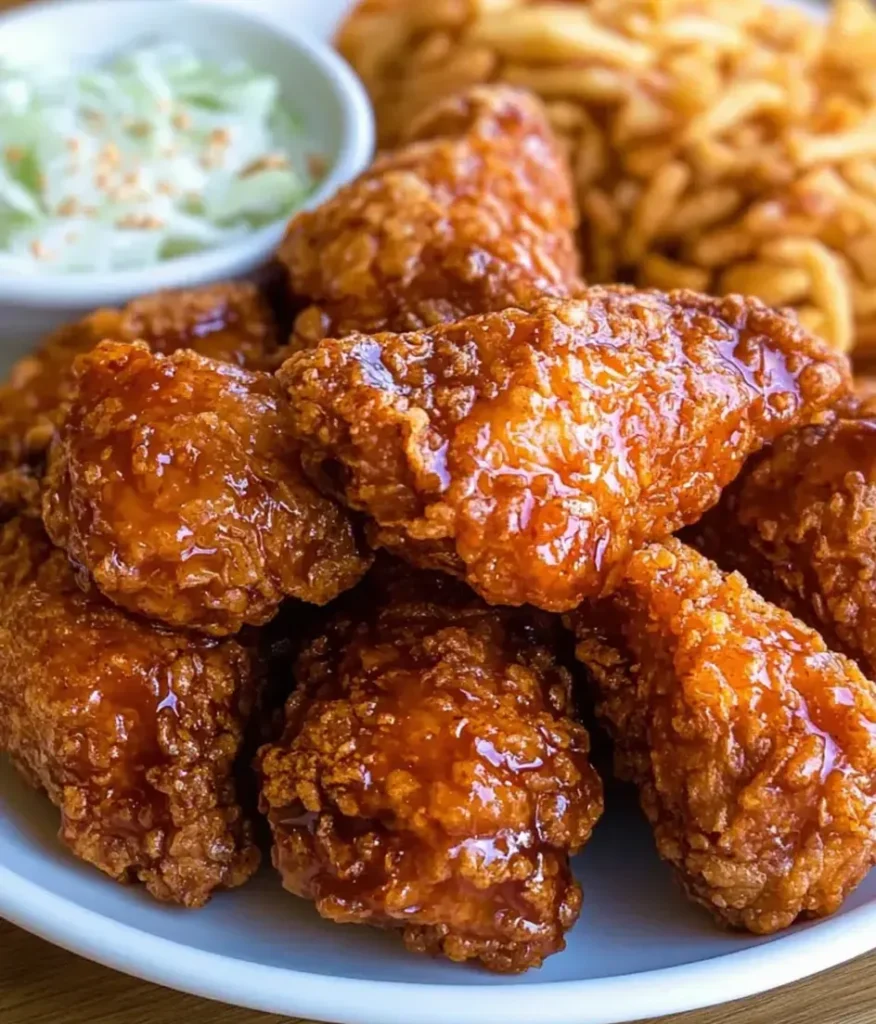
Coating the Chicken
Now that your chicken is golden and crisp, and your sauce is rich and sticky, it’s time to bring everything together.
Step 1: Toss or Brush the Chicken
While the chicken is still hot:
- Place it in a large mixing bowl.
- Pour the warm Yangnyeom sauce over the chicken.
- Toss to coat using tongs or gently stir with a wooden spoon.
Make sure each piece is thoroughly glazed. You can also use a basting brush if you prefer a lighter coating or want to serve sauce on the side.
Step 2: Garnish (Optional but Recommended)
Sprinkle with:
- Toasted sesame seeds
- Thinly sliced green onions
- Crushed peanuts or chopped fresh chili for extra crunch and heat
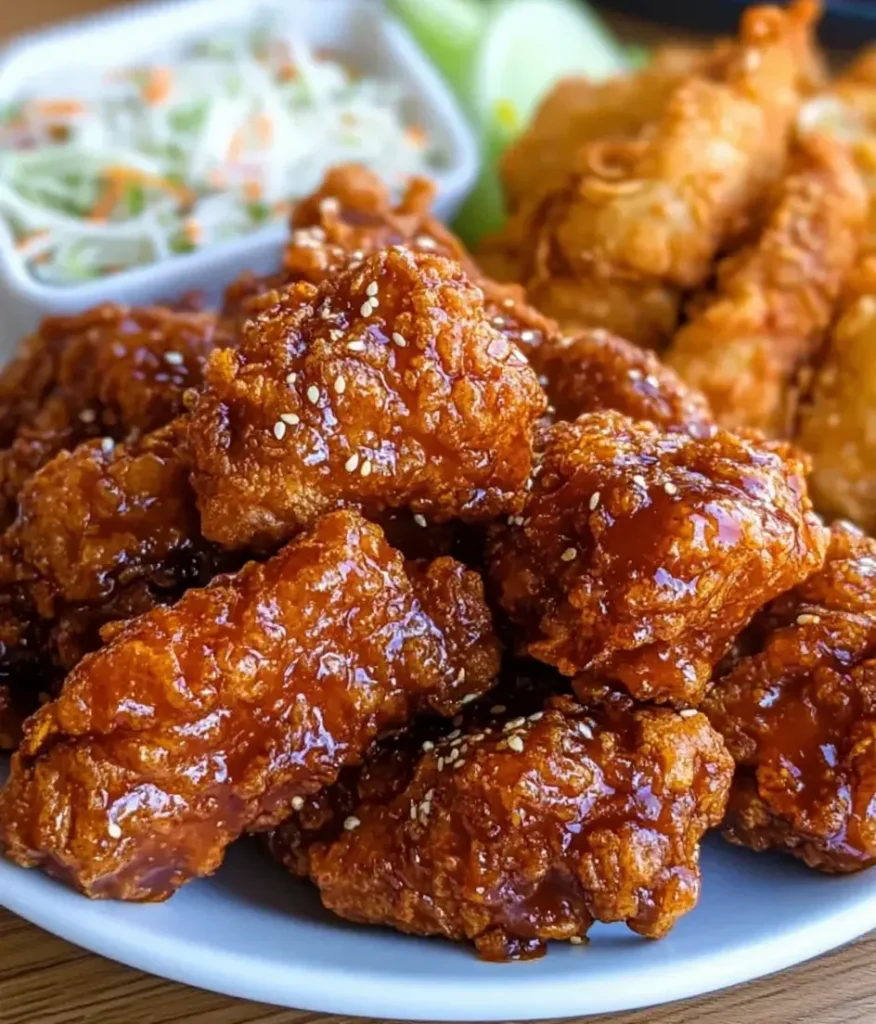
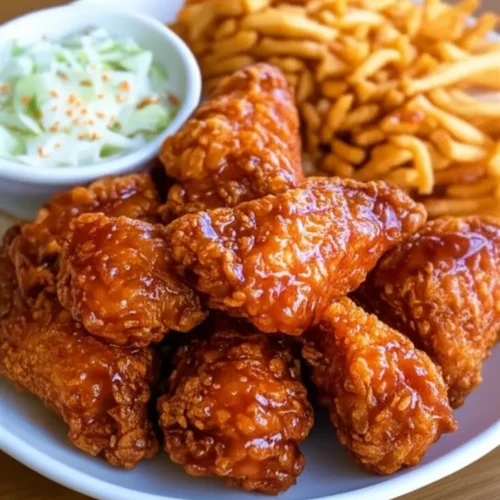
These final touches add both flavor and visual appeal, turning a simple dish into a showstopper.
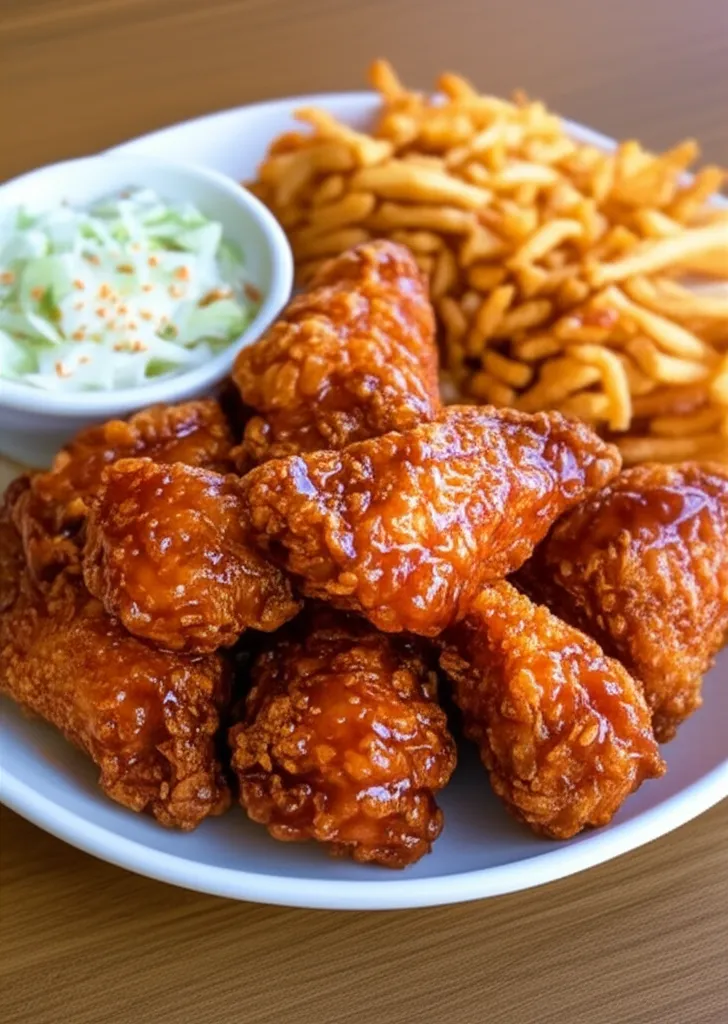
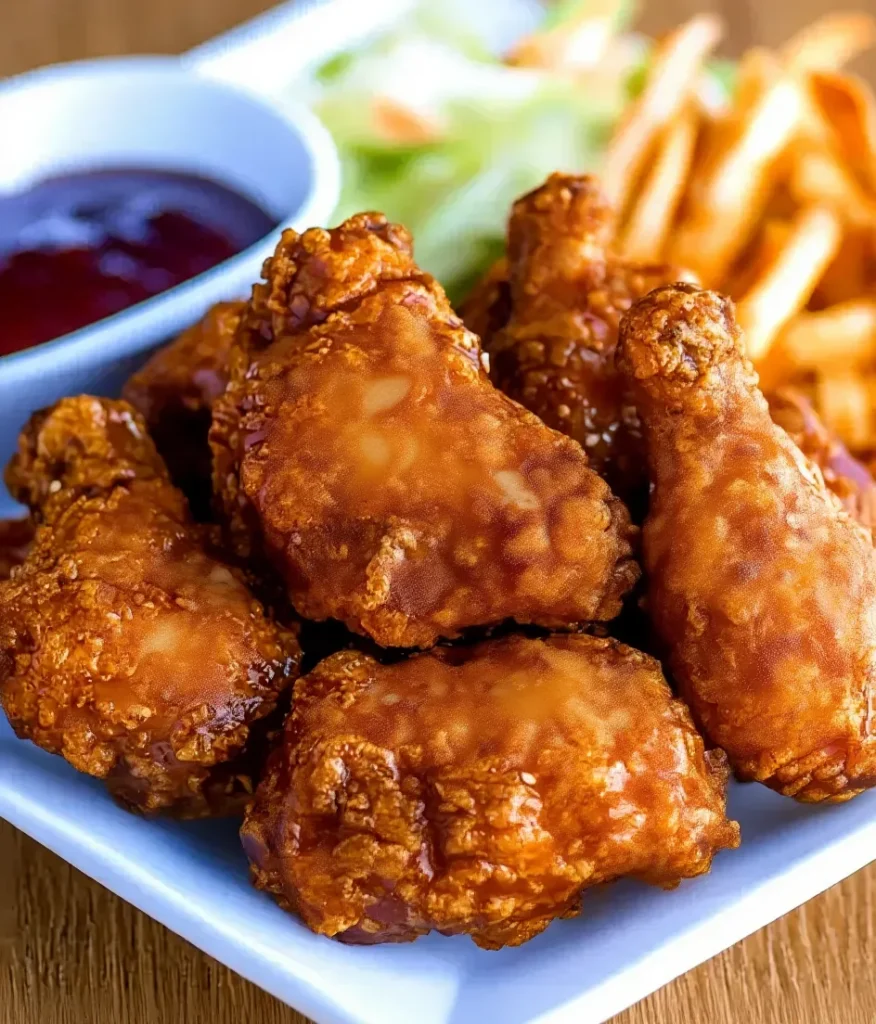
Serving and Presentation
When it comes to enjoying Korean Fried Chicken, presentation and pairing make all the difference. Serve your chicken hot and crispy right after tossing it in the sauce — that’s when it’s at its flavorful peak.
Suggested Sides and Pairings
- Pickled Radish (Chicken-Mu): A classic Korean side dish, its tangy crunch balances the richness of the fried chicken perfectly.
- Steamed Rice: Plain rice is a neutral base that soaks up the sauce and mellows out the spice.
- Cold Beer or Soju: If you’re going for the full Korean experience, this chicken pairs beautifully with a chilled glass of beer or soju — a combo known as chimaek (chicken + maekju, the Korean word for beer).
- Kimchi Slaw: For a spicy, fermented crunch that cuts through the richness of the glaze.
Storage Instructions
Keeping Korean Fried Chicken Fresh
If you have leftovers (rare, but it happens!), here’s how to store them properly:
- Refrigerator: Store cooled chicken in an airtight container. It will stay fresh for up to 2 days. Keep in mind the crispiness may soften due to the sauce.
- Freezer: For longer storage, freeze unglazed, double-fried chicken in a single layer, then transfer to a freezer-safe bag. When ready to eat, reheat in an oven or air fryer and toss in freshly made sauce.
Reheating Tips
- Use an oven or air fryer at 375°F (190°C) for 8–10 minutes to regain crispiness. Avoid microwaving — it will turn the crust soggy.
- If the chicken is already glazed, reheat uncovered to avoid excess moisture buildup.
Korean Fried Chicken (Yangnyeom Chicken)
Equipment
- Deep Frying Pot or Dutch Oven
- Kitchen Thermometer
- Mixing Bowls
- Wire Cooling Rack
- Tongs or Chopsticks
- Whisk
- Basting Brush or Large Bowl
Ingredients
Chicken and Batter Ingredients
- 2 lbs chicken wings and drumettes
- ½ cup potato starch
- ¼ cup all-purpose flour
- 1 tsp garlic powder
- ½ tsp black pepper
- ½ tsp salt
- ¼ tsp cayenne pepper (optional, for extra heat)
- 1 egg
- ½ tsp baking powder
- ⅓ cup ice-cold club soda
- Peanut oil (for deep frying)
Yangnyeom Sauce Ingredients (Korean Spicy Glaze)
- ¼ cup extra spicy gochujang (Korean chili paste)
- ¼ cup rice syrup (or honey)
- 3 garlic cloves, minced
- 1 tbsp soy sauce
- 1 tbsp brown sugar
- 1 tsp sesame oil
- 1 tsp rice vinegar
- 1 tbsp water (optional, to thin the sauce)
Instructions
Chicken Preparation
- Start by patting the chicken wings and drumettes dry with paper towels. This helps the batter stick better and ensures a crispy texture after frying. In a large bowl, season the chicken with: Salt Garlic powder Black pepper Optional cayenne pepper (if you like extra heat) Mix well to coat all the pieces evenly. Cover the bowl and refrigerate for at least 1 hour. This step enhances flavor and helps the seasoning absorb into the meat.
- For the ultra-crispy exterior that Korean fried chicken is famous for, we’ll be using a dual-batter system: one wet and one dry. ¼ cup all-purpose flour ,1 egg ,½ tsp baking powder ,⅓ cup ice-cold club soda The batter should be light and slightly runny. The cold soda creates bubbles, leading to a crispier finish.
- Pour peanut oil into a deep pot or Dutch oven until it’s at least 2 inches deep. Heat the oil to 350°F (175°C). Use a kitchen thermometer to monitor the temperature accurately.
- Take each piece of seasoned chicken and: Dip it into the wet batter. Let any excess drip off. Coat it generously in the dry potato starch mixture. Shake off any excess and set aside on a tray.
- Carefully place 4–5 pieces of chicken into the hot oil. Don’t overcrowd the pan — it will drop the temperature and result in soggy chicken. Fry for about 7 minutes, until lightly golden and partially cooked. Remove with tongs or a slotted spoon and place on a wire rack to drain.
- Once all the chicken pieces have gone through the first fry, raise the oil temperature to 370°F (188°C). Fry the chicken again in small batches for 1–2 minutes, or until they turn a deep golden brown and sound crisp when tapped. Double-frying is the key to ultra-crunchy Korean fried chicken that stays crispy even after adding sauce.
Making the Yangnyeom Sauce
- In a small saucepan over medium heat, add a dash of neutral oil (you can use a bit of the frying oil or sesame oil for extra flavor). Add the minced garlic and sauté for about 30 seconds until fragrant. Be careful not to burn it — you want it golden, not brown.
- Whisk everything together and let the sauce simmer gently for 2–3 minutes, just until it thickens slightly and becomes glossy. Once done, remove it from the heat and set it aside.
Conclusion
Mastering Korean Fried Chicken at home is one of the most satisfying kitchen wins you can achieve. The secret lies in the double-frying technique, the perfectly balanced Yangnyeom sauce, and not rushing any step of the process. Whether you’re a fried chicken fan or just craving something spicy, crispy, and sweet all at once — this dish delivers it all.
With just a few pantry staples, the right method, and some patience, you can bring the bold, addictive flavors of Korean street food straight into your kitchen. So fire up that stove, put on some K-pop in the background, and get ready to impress yourself (and your guests) with every crispy, saucy bite.