Craving a no-bake dessert that’s as delicious as it is easy to make? Look no further than this Icebox Cake! With layers of creamy whipped topping and crunchy chocolate wafer cookies, this dessert is a crowd favorite.
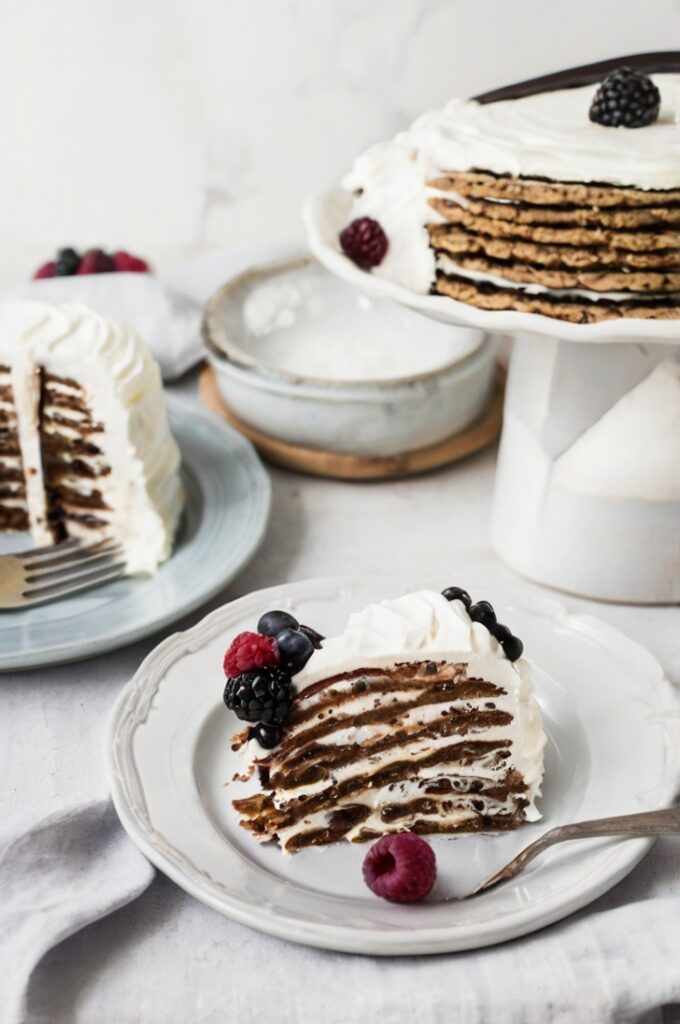
Not only is it incredibly simple to assemble, but the longer it sits in the fridge, the more the cookies soften, creating a delightful, cake-like texture.
Plus, it’s a perfect dessert for any occasion, from family dinners to summer BBQs. Trust me, this icebox cake will become your go-to for effortless yet impressive desserts!
Ingredients List
Whipped Cream Ingredients
- 3 ½ cups very cold heavy whipping cream
- ½ cup powdered sugar (confectioners’ sugar)
- 1 teaspoon vanilla extract
- ¼ teaspoon salt
Cookie Ingredients
- 9 ounces chocolate wafer cookies (about 29 wafers) or 40 chocolate graham crackers
Optional Garnish
- Chocolate sprinkles
- Crushed chocolate wafer cookies or graham cracker crumbs
- Shaved chocolate curls
Required Kitchen Tools
Before diving into the recipe, let’s make sure you have the necessary tools to make this delicious dessert:
- Electric Mixer: A hand or stand mixer is key to quickly whipping up the perfect cream. Be sure to chill the bowl beforehand for the best results.
- Serving Platter or Dish: Whether you’re assembling the cake into a log shape or layers, a serving platter (about 14 inches long and 5 inches wide) or a 9×13-inch dish is essential.
- Spatula: For spreading the whipped cream smoothly and evenly across the cookies and throughout the layers.
- Plastic Wrap or Covering: To loosely cover the cake while it chills in the refrigerator.
Having these tools will make the whole process smoother and help you create a stunning dessert.
Whipped Cream Preparation
Making the whipped cream for this icebox cake is a simple process, but it’s crucial to get that perfect texture. The key to success is chilling your bowl and mixer beforehand—this ensures your whipped cream will whip up light and fluffy. Here’s how to prepare it:
How to Make the Whipped Cream
- Chill Your Bowl and Whisk: Place your mixing bowl and beaters in the freezer for about 10 minutes. This step helps to speed up the whipping process and ensures the cream whips up better.
- Mix the Ingredients: Add the very cold heavy whipping cream, powdered sugar, vanilla extract, and salt into the chilled bowl.
- Whip the Cream: Using an electric mixer, start on low speed and gradually increase to high. Beat the mixture until stiff peaks form, which usually takes about 3-5 minutes. Be careful not to overwhip, as it can turn into butter!
The whipped cream should now be light, fluffy, and ready to layer in between those delicious cookies. Set it aside while you prepare the cookie layers.
Assembling the Icebox Cake
Now comes the fun part—putting it all together! Whether you’re creating a log shape with the chocolate wafer cookies or opting for a classic layered version with graham crackers, the assembly is simple and quick. Let’s break down both options.
Option 1: The Cookie Log (Using Chocolate Wafers)
- Start with a Thin Layer of Whipped Cream: On your serving platter, spread a very thin layer of whipped cream in a stripe down the middle. This layer will help to anchor your cake in place as you build it.
- Create the Cookie Sandwiches: Take one chocolate wafer cookie and spread about 1 tablespoon of whipped cream on it. Place another wafer cookie on top to create a sandwich. Repeat this process, stacking cookies and whipped cream until you have 5 cookies stacked together.
- Form the Log Shape: Place the stack of cookies sideways on the platter, resembling a log. Repeat this process with the remaining cookies to form a long log of cookies and whipped cream.
Option 2: The Layered Cake (Using Graham Crackers)
- Layer the Graham Crackers: Spread a thin layer of whipped cream in the bottom of a 9×13-inch dish. Lay down a layer of graham crackers, breaking them if needed to fit the dish.
- Add More Cream: Gently spread about a quarter of the whipped cream over the graham crackers. Add another layer of graham crackers on top, and repeat the process until you have four layers of graham crackers and whipped cream.
Once you’ve finished assembling the layers, use the remaining whipped cream to cover the top and sides of the cake.

Chilling the Cake
After assembling your icebox cake, it’s time for the most important step: refrigeration. This is where the magic happens, as the cookies soften and absorb the whipped cream, transforming into a moist, cake-like texture. The longer it sits, the better it gets!
How Long Should You Refrigerate?
- Refrigerate for at Least 4 Hours: While 4 hours will give the cake enough time to soften, the flavors will meld together even more if you let it sit overnight. The whipped cream will infuse into the cookies, and the whole cake will have a more cake-like consistency, making each slice just as delicious as the last.
- Cover Loosely: You want to cover the cake loosely with plastic wrap or a lid. This will help keep it from drying out while still allowing air to circulate around it.
Optional Garnishes and Decorations
After the cake has chilled and softened, it’s time to add a final touch of sweetness and style. These optional garnishes will take your icebox cake to the next level!
- Chocolate Sprinkles: Add a fun crunch with a sprinkle of chocolate sprinkles on top of the cake.
- Crushed Chocolate Wafers or Graham Crackers: For extra texture and flavor, crush some chocolate wafer cookies or graham crackers and sprinkle them over the top.
- Shaved Chocolate Curls: For a more elegant presentation, use a vegetable peeler to shave a bar of chocolate into delicate curls. These look beautiful and add a rich chocolatey touch.
Serving and Enjoying the Icebox Cake
Once your icebox cake has had ample time to chill, it’s time to serve and enjoy this creamy, dreamy dessert. Here’s how to cut, serve, and store it:
How to Serve the Icebox Cake
- Slice Diagonally: To reveal the beautiful layers of whipped cream and cookies, slice the icebox cake diagonally. This not only showcases the layers but also gives each slice a perfect mix of cream and cookie.
- Serve Chilled: Icebox cake is best served cold. The chilled layers will be firm, making it easy to slice and enjoy. The creamy whipped topping complements the soft cookie layers for a satisfying bite every time.
How to Store Leftovers
While this cake is often devoured quickly, if you have any leftovers, here’s how to store them:
- Refrigeration: Since icebox cake needs to stay chilled, always store it in the refrigerator. Keep it loosely covered with plastic wrap or in an airtight container to prevent it from drying out. It will stay fresh for up to 3-4 days, though it’s best enjoyed within the first 2 days.

Icebox Cake
Equipment
- Electric Mixer
- Serving Platter or Dish
- Spatula
- Plastic Wrap or Covering
Ingredients
Whipped Cream Ingredients
- 3 ½ cups very cold heavy whipping cream
- ½ cup powdered sugar (confectioners' sugar)
- 1 teaspoon vanilla extract
- ¼ teaspoon salt
Cookie Ingredients
- 9 ounces chocolate wafer cookies (about 29 wafers) or 40 chocolate graham crackers
Optional Garnish
- Chocolate sprinkles
- Crushed chocolate wafer cookies or graham cracker crumbs
- Shaved chocolate curls
Instructions
Whipped Cream Preparation
- Place your mixing bowl and beaters in the freezer for about 10 minutes. This step helps to speed up the whipping process and ensures the cream whips up better.
- Add the very cold heavy whipping cream, powdered sugar, vanilla extract, and salt into the chilled bowl.
- Using an electric mixer, start on low speed and gradually increase to high. Beat the mixture until stiff peaks form, which usually takes about 3-5 minutes. Be careful not to overwhip, as it can turn into butter!
Assembling the Icebox Cake
- On your serving platter, spread a very thin layer of whipped cream in a stripe down the middle. This layer will help to anchor your cake in place as you build it.
- Take one chocolate wafer cookie and spread about 1 tablespoon of whipped cream on it. Place another wafer cookie on top to create a sandwich. Repeat this process, stacking cookies and whipped cream until you have 5 cookies stacked together.
- Place the stack of cookies sideways on the platter, resembling a log. Repeat this process with the remaining cookies to form a long log of cookies and whipped cream.
- Spread a thin layer of whipped cream in the bottom of a 9×13-inch dish. Lay down a layer of graham crackers, breaking them if needed to fit the dish.
- Gently spread about a quarter of the whipped cream over the graham crackers. Add another layer of graham crackers on top, and repeat the process until you have four layers of graham crackers and whipped cream.
Chilling the Cake
- While 4 hours will give the cake enough time to soften, the flavors will meld together even more if you let it sit overnight. The whipped cream will infuse into the cookies, and the whole cake will have a more cake-like consistency, making each slice just as delicious as the last.
- You want to cover the cake loosely with plastic wrap or a lid. This will help keep it from drying out while still allowing air to circulate around it.
Conclusion
This no-bake Icebox Cake is the perfect dessert to prepare when you want something sweet but don’t want to spend hours in the kitchen. Whether you make it with chocolate wafer cookies or graham crackers, this treat is rich, creamy, and irresistibly good. It’s easy to customize with different toppings or garnishes, making it a versatile dessert for any occasion.
With just a few simple ingredients and steps, you can create a dessert that everyone will love. So, gather your ingredients, chill that whipped cream, and get ready to indulge in this delightful icebox cake!