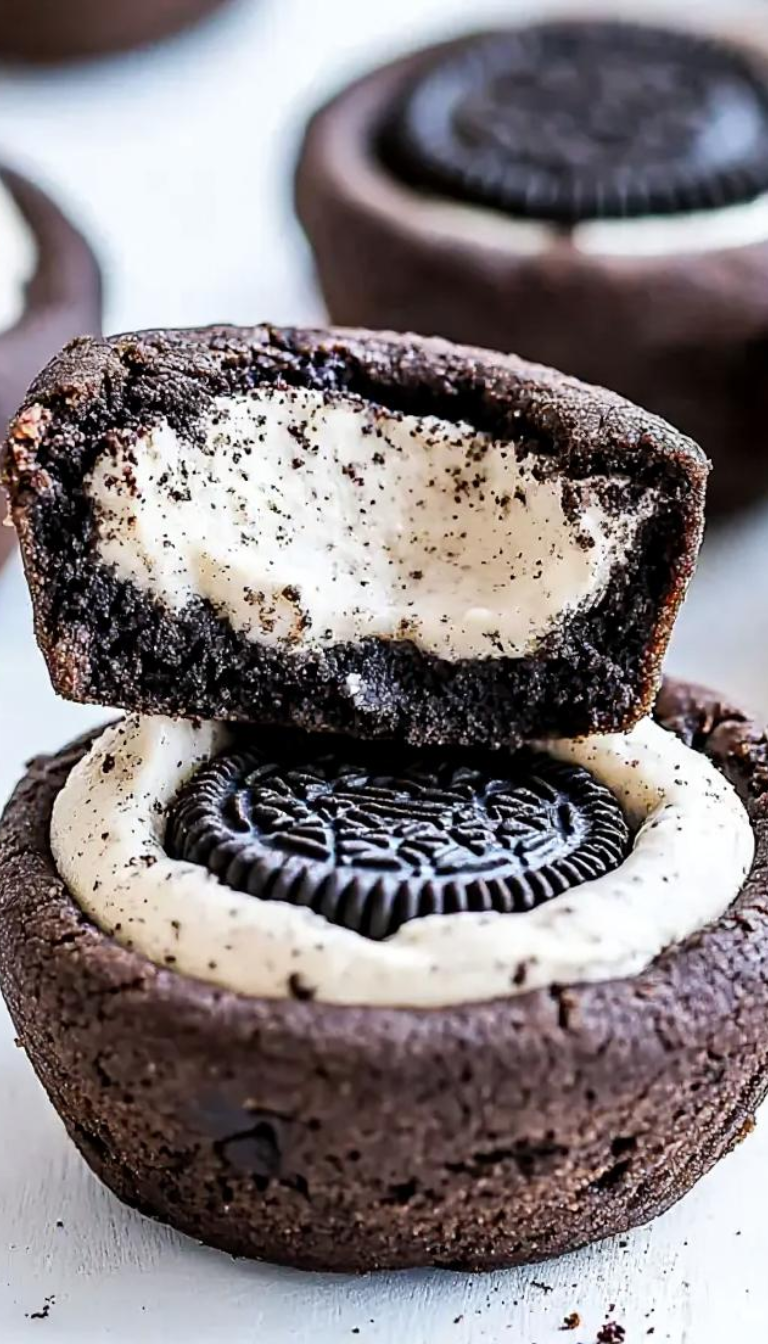
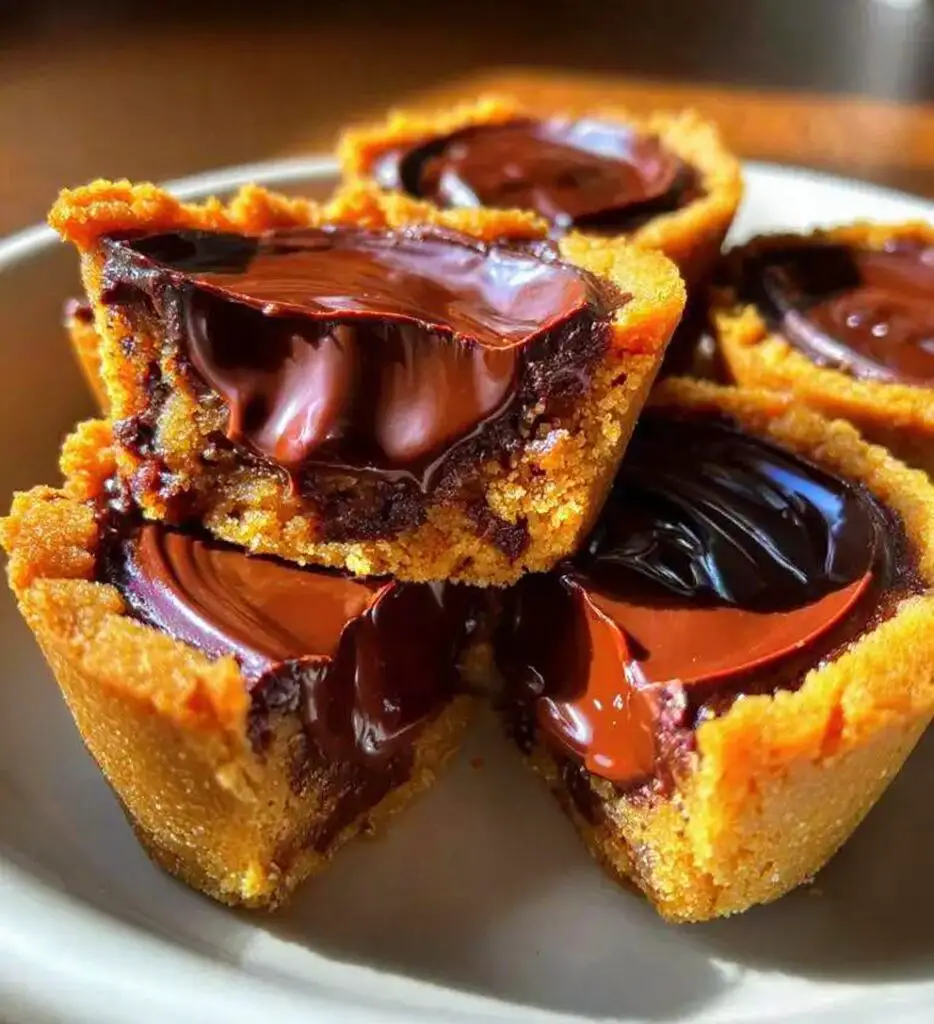
Craving a rich, gooey treat that blends the nostalgia of chocolate chip cookies with the indulgence of a cupcake? These Chocolate Chip Cookie Dough Cups are your new dessert obsession!

Soft, buttery, and packed with mini chocolate chips, these cup-style cookies are baked to golden perfection and offer the ideal balance of chewy and crisp.
Whether you’re looking for a quick dessert fix or a sweet party treat, this simple recipe delivers big flavor with minimal effort.
Ingredients List
Cookie Dough Ingredients
- 1 cup all-purpose flour
- ½ cup unsalted butter, softened
- ½ cup brown sugar
- ¼ cup granulated sugar
- 1 teaspoon vanilla extract
- ¼ cup milk
- ¼ teaspoon salt
- 1 cup mini chocolate chips
Required Kitchen Tools
Making Chocolate Chip Cookie Dough Cups is a breeze when you have the right tools in your kitchen. Here’s what I recommend:
- Mixing Bowls: You’ll need a few medium-sized bowls to cream the butter and mix your dough ingredients.
- Electric Mixer or Hand Whisk: To cream the butter and sugars to a light, fluffy texture.
- Rubber Spatula: Perfect for folding in mini chocolate chips without overmixing.
- Standard Muffin Tin: This is essential for creating that signature cup shape.
- Non-stick Spray or Cupcake Liners: To ensure easy release after baking.
- Oven Thermometer (Optional): To guarantee your oven is baking at the correct temperature.
Having these tools ready ensures your baking session is smooth, mess-free, and deliciously rewarding.

Dough Preparation
Creating the perfect cookie dough is the foundation of these chocolate chip cookie dough cups. The process is quick and straightforward, making this recipe a go-to for both beginner and seasoned bakers.
Creaming the Butter and Sugars
Start by preheating your oven to 350°F (175°C). While the oven heats, place the softened butter, brown sugar, and granulated sugar into a mixing bowl. Using a hand or stand mixer, cream the ingredients together until the mixture becomes light, fluffy, and smooth — this usually takes about 2–3 minutes. This step is essential for a soft, chewy texture.
Adding Wet Ingredients
Once the butter and sugars are fully creamed, mix in the vanilla extract and milk. Stir until everything is well incorporated. The mixture should now look smooth and slightly glossy, setting the stage for the dry ingredients.
Mixing in the Dry Ingredients
In a separate bowl, combine the flour and salt. Slowly add this dry mixture to your wet ingredients, mixing just until the dough comes together. Be careful not to overmix — this can make the final cups dense rather than soft and tender.
Folding in the Chocolate Chips
Finally, gently fold in the mini chocolate chips using a rubber spatula. These little chips ensure every bite is packed with melty, chocolatey goodness. Don’t overwork the dough at this stage; a gentle hand keeps the dough light and soft.
Shaping the Cookie Dough Cups
Now that your dough is ready, it’s time to shape those delicious cookie cups.
- Grease the Muffin Tin: Lightly grease each cavity of a standard muffin tin or line them with paper cupcake liners to prevent sticking.
- Spoon the Dough: Using a tablespoon or small cookie scoop, spoon the cookie dough evenly into each muffin cup. Fill each about ¾ full.
- Create a Cup Shape (Optional): If you want a deeper center for adding toppings later (like ganache, frosting, or a dollop of more cookie dough), press down gently in the center of each portion using the back of a spoon.
Once prepped, your dough cups are ready to bake to golden perfection.
Baking the Cookie Dough Cups
Now that your cookie dough is shaped and ready in the muffin tin, it’s time to bring these treats to life in the oven.
Bake Until Lightly Golden
Place your prepared muffin tin on the center rack of your preheated 350°F (175°C) oven. Bake the cookie dough cups for 10–12 minutes, or until the tops are lightly golden and the edges look set. The centers may appear slightly underbaked — that’s perfect! This helps keep the inside soft and gooey while the outer edges remain lightly crisp.
Cooling for Perfect Texture
Once baked, remove the muffin tin from the oven and let the cookie dough cups cool in the pan for 10 minutes. This allows them to firm up just enough to hold their shape. Then, gently transfer them to a wire rack to cool completely.
If you created an indentation before baking and want to deepen it further for a filling, press down the centers again with the back of a spoon immediately after baking while they’re still warm.
Optional Add-Ins and Customizations
Want to take your chocolate chip cookie dough cups to the next level? Here are a few delicious ways to customize them:
- Fill with Ganache or Nutella: Spoon or pipe in rich chocolate ganache or creamy Nutella once the cups are fully cooled.
- Top with Ice Cream: Turn these into mini cookie cup sundaes by adding a scoop of your favorite ice cream and a drizzle of caramel or fudge.
- Stuff with Cookie Dough: Chill some eggless cookie dough and add a dollop in the center for a double-cookie-dough experience.
- Add a Surprise Center: Try pressing a mini peanut butter cup or caramel candy into the center before baking for a gooey, molten core.
Whether you keep them classic or get creative, these cookie dough cups are the ultimate dessert for any occasion.
Serving and Presentation
Best Ways to Enjoy Cookie Dough Cups
These Chocolate Chip Cookie Dough Cups are best enjoyed slightly warm when the chocolate chips are still melty and the centers are soft and gooey. For a simple presentation, serve them as-is with a cold glass of milk. If you’re hosting or looking to impress, add a dusting of powdered sugar, a drizzle of chocolate sauce, or a dollop of whipped cream on top.
They also pair beautifully with:
- Vanilla bean ice cream
- Salted caramel drizzle
- Fresh berries for a fruity contrast
These dessert cups are not just tasty — they’re visually appealing and perfect for sharing at gatherings, potlucks, or holiday parties.
Storage Instructions
How to Keep Cookie Dough Cups Fresh
If you happen to have leftovers (doubtful!), store your cookie dough cups in an airtight container at room temperature for up to 3 days. To keep them soft, place a slice of bread in the container — it helps maintain moisture without affecting flavor.
Freezing for Later
Want to make a batch ahead of time? These cookie dough cups freeze beautifully. After baking and cooling, place them in a single layer in a freezer-safe container or bag. They’ll stay fresh for up to 2 months. When ready to enjoy, simply thaw at room temperature or warm them in the microwave for 10–15 seconds for that fresh-from-the-oven feel.

Chocolate Chip Cookie Dough Cups
Equipment
- Mixing Bowls
- Electric Mixer or Hand Whisk
- Rubber Spatula
- Standard Muffin Tin
- Non-stick Spray or Cupcake Liners
- Oven Thermometer (optional)
Ingredients
Cookie Dough Ingredients
- 1 cup all-purpose flour
- ½ cup unsalted butter, softened
- ½ cup brown sugar
- ¼ cup granulated sugar
- 1 teaspoon vanilla extract
- ¼ cup milk
- ¼ teaspoon salt
- 1 cup mini chocolate chips
Instructions
Dough Preparation
- Start by preheating your oven to 350°F (175°C). While the oven heats, place the softened butter, brown sugar, and granulated sugar into a mixing bowl. Using a hand or stand mixer, cream the ingredients together until the mixture becomes light, fluffy, and smooth — this usually takes about 2–3 minutes. This step is essential for a soft, chewy texture.
- Once the butter and sugars are fully creamed, mix in the vanilla extract and milk. Stir until everything is well incorporated. The mixture should now look smooth and slightly glossy, setting the stage for the dry ingredients.
- In a separate bowl, combine the flour and salt. Slowly add this dry mixture to your wet ingredients, mixing just until the dough comes together. Be careful not to overmix — this can make the final cups dense rather than soft and tender.
- Finally, gently fold in the mini chocolate chips using a rubber spatula. These little chips ensure every bite is packed with melty, chocolatey goodness. Don’t overwork the dough at this stage; a gentle hand keeps the dough light and soft.
Shaping the Cookie Dough Cups
- Grease the Muffin Tin: Lightly grease each cavity of a standard muffin tin or line them with paper cupcake liners to prevent sticking.Spoon the Dough: Using a tablespoon or small cookie scoop, spoon the cookie dough evenly into each muffin cup. Fill each about ¾ full.Create a Cup Shape (Optional): If you want a deeper center for adding toppings later (like ganache, frosting, or a dollop of more cookie dough), press down gently in the center of each portion using the back of a spoon.
- Place your prepared muffin tin on the center rack of your preheated 350°F (175°C) oven. Bake the cookie dough cups for 10–12 minutes, or until the tops are lightly golden and the edges look set. The centers may appear slightly underbaked — that’s perfect! This helps keep the inside soft and gooey while the outer edges remain lightly crisp.
- Once baked, remove the muffin tin from the oven and let the cookie dough cups cool in the pan for 10 minutes. This allows them to firm up just enough to hold their shape. Then, gently transfer them to a wire rack to cool completely.If you created an indentation before baking and want to deepen it further for a filling, press down the centers again with the back of a spoon immediately after baking while they’re still warm.
Conclusion
There’s something magical about combining the nostalgic flavor of chocolate chip cookie dough with the irresistible form of a cupcake. These Chocolate Chip Cookie Dough Cups offer the best of both worlds — buttery, chewy, chocolate-packed, and endlessly customizable. Whether you enjoy them plain, filled, or topped with your favorite extras, they’re sure to become a staple in your dessert rotation.
So grab your muffin tin, whip up a batch, and treat yourself (and your friends) to this easy, satisfying indulgence. Don’t forget to share your creations on social media and tag your favorite baking community — because these cookie dough cups are too good to keep to yourself!